
The ANTS and ITK projects use CMake for build configuration and Makefile creation. Download the latest CMake binary distribution from http://www.cmake.org/cmake/resources/software.html. ANTS requires version 2.8 or later.
CMake allows for a common build and test configuration across different platforms. Configurations are defined in CMakeLists.txt files. The CMakeLists.txt file in the top level of a source tree is the only CMake file you’ll likely work with. Mainly you’ll only be editing this to add tests, as described in Testing & User Documentation.
Generally, all you’ll do is run the ccmake command from a terminal to use the interactive UI for setting project configurations. More details are given below in the sections on building ITK and ANTS.
For other notes on using CMake and CTest, see CMake & CTest Notes.
In order to build the ANTS user documentation, you need Sphinx and Latex.
Sphinx
Sphinx is a documentation generation tool used to build the user documentation. Sphinx is also used to create this document.
You should be able to install it using the command easy_install -U Sphinx, as given on the Sphinx homepage.
Latex
Latex is required by Sphinx for rendering mathematical formulas.
See http://www.latex-project.org/.
Note
Mac OSX
MacTeX is recommended for OSX: http://www.tug.org/mactex/2009/.
However, the “BasicTeX” version does not seem to work properly. Try the full MacTeX download or the generic unix download TexLive: http://www.tug.org/texlive/
It’s best not to build ANTS (or ITK) in your version control repository directory. That is, don’t build ANTS in the dir into which you cloned from git. If you do, it becomes messy to keep the build products and intermediary files out of the git repository when you commit changes. Instead, create a separate directory tree for builds. Convention here looks like this:
source dir: <parent>/code/src/ANTS
build dir: <parent>/code/bin/ANTS
These directores are called <ANTS source dir> and <ANTS build dir> in this document.
With CMake it’s easy to build into a different directory. See Building.
You need to have ITK installed before building and using ANTS.
Download and build the latest release of the ITK “InsightToolkit” from here (currently 3.20 as of Sep, 2010): http://www.itk.org/ITK/resources/software.html.
This is a source download. You’ll need to build it according to instructions below.
Todo
ITK version - I think we’re still to use 3.20, but at what point do we need to use the latest git version to include reg pipeline changes, or otherwise?
ANTS requires that ITK be built with the “review” options “on”.
Enable the “review” options when building ITK:
Homepage: http://www.picsl.upenn.edu/ANTS/
We are currently developing ANTS 2. The latest version is in the Git repository:
http://sourceforge.net/scm/?type=git&group_id=232491
To get started with Git, see Git.
In order to contribute code to the project, create a Sourceforge account and send your username to one of the lead ANTS developers.
Note
To access the repository from behind a firewall, use the Git command:
git clone ssh://USERNAME@advants.git.sourceforge.net/gitroot/advants/advants
where USERNAME is your sourceforge username.
After you “checkout” ANTS via Git, you should see these directories: dir-layout-label.
Make a separate build dir for ANTS (see Build and Source Directories), and run ccmake (the console UI tool for the CMake tool) from the build dir, pointing to your ANTS source dir. For example:
computer:~code/bin/ANTS$ ccmake ~/code/src/ANTS
Your terminal window should look similar to this:
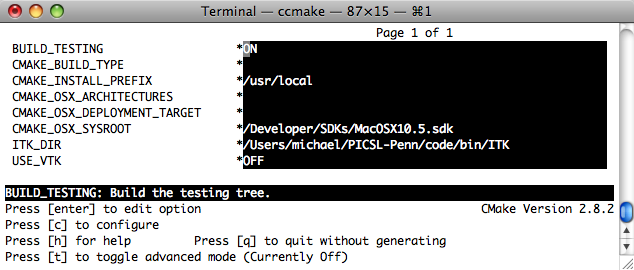
ccmake allows you to setup configuration options for the ANTS project, then will generate a set of Makefiles that you run after exiting ccmake.
You should see an option ITK_DIR that should point to your ITK build dir. If not, either enter it manually, or quit and make sure you’ve set the ITK_DIR environment variable to point to your ITK build dir. If you haven’t installed ITK at all, do so now. See ITK Installation.
Next type “c” for configure. Some versions of cmake will complain about something or other – often, you can ignore this and just type configure one or two more times and cmake will get the picture.
Finally, hit ‘g’ to generate the makefiles (this option appears when confiuration is complete) and ccmake will exit when finished. Then, within the same directory, type make to build the ANTS project.
You can easily run a set of testing routines after your build is complete. These tests are created during the development process to provide “application level” testing of the ANTS user tool routines.
From the top of your build directory, run ctest, and all the available tests should run, and a pass/fail report will be displayed.
For more details, see the developer documentation: Testing & User Documentation.
